What Dual Axis C-arm Fluoroscopy Can Teach Us About Image Guidance

At our Colorado HQ site, we recently brought in dual-axis fluoroscopy. What’s that and what can that teach us about the critical importance of imaging guidance in interventional orthobiologics? Let’s jump in.
What is Fluoroscopy?
Fluoroscopy is a live x-ray technology. It’s part of the one-two punch of imaging guidance technologies that are required equipment to practice interventional orthobiologics at a high level. The other technology is ultrasound imaging.
Why is guidance so critical in advanced injections? Well, think about trying to drive your car if someone spray-painted all of the windows black. It wouldn’t be long before you crashed. Meaning we all take for granted that you need to see the road to make sure you can guide your car safely from point A to point B. That’s what imaging guidance does for a doctor trying to get a needle into a specific structure in the body. It helps to keep that accurate and safe.
Fluoroscopy vs Ultrasound
In performing interventional orthobiologics procedures, which is the precision injection of things that can heal or mitigate tissue damage in the musculoskeletal system, the choice of imaging technology depends on the application. For example, if you’re injecting a structure that’s more superficial, you can’t beat the ability of ultrasound to accurately visualize the soft tissues. However, if you’re injecting deeper structures like the spine, you can’t beat the ability of fluoroscopy to visualize exactly where your injectate will travel even if bones are in the way.
Advanced interventional orthobiologics practices have and are proficient in both of these technologies. If there’s only one, like ultrasound, while you can accurately inject many structures, the deeper structures that are surrounded by bone are usually off-limits. In the same way, not having an ultrasound machine and only using fluoroscopy will make more superficial injections less accurate.
What is Dual Axis Fluoroscopy?
When you’re guiding needles using fluoroscopy you constantly need to see the front (AP) and side (Lateral) views. Those two create a 3D picture of the exact needle location. That’s usually accomplished by moving the C-arm from one position to the next. If you do this quite a bit, it’s best to use larger fluoroscopy machines made for interventional spine cases that are called “Super-C’s”. The “C” merely means that part of the machine looks like the letter “C” and that part in these spine-focused imaging devices is bigger.
If you’re performing a procedure that requires lots of back on forth on the AP and lateral views, that’s when dual-axis fluoroscopy may come in handy. For example, our Colorado HQ site is the only one that performs the PICL procedure I created to treat craniocervical instability and to help patients avoid upper neck fusion. That procedure requires a massive amount of back and forth imaging. Every time you move the c-arm, more radiation is also used to get the C-arm positioned perfectly in that view.

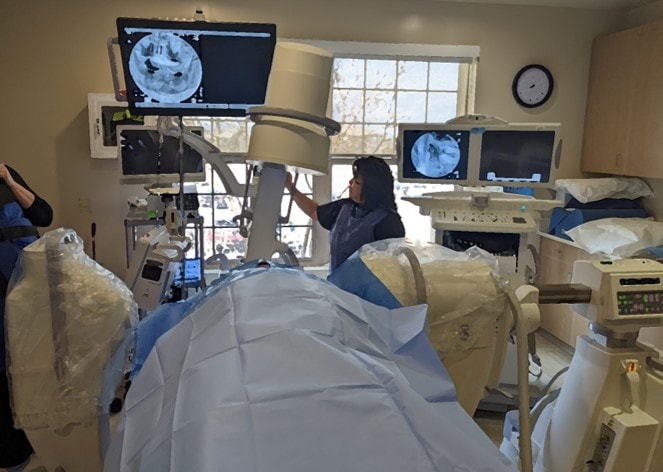
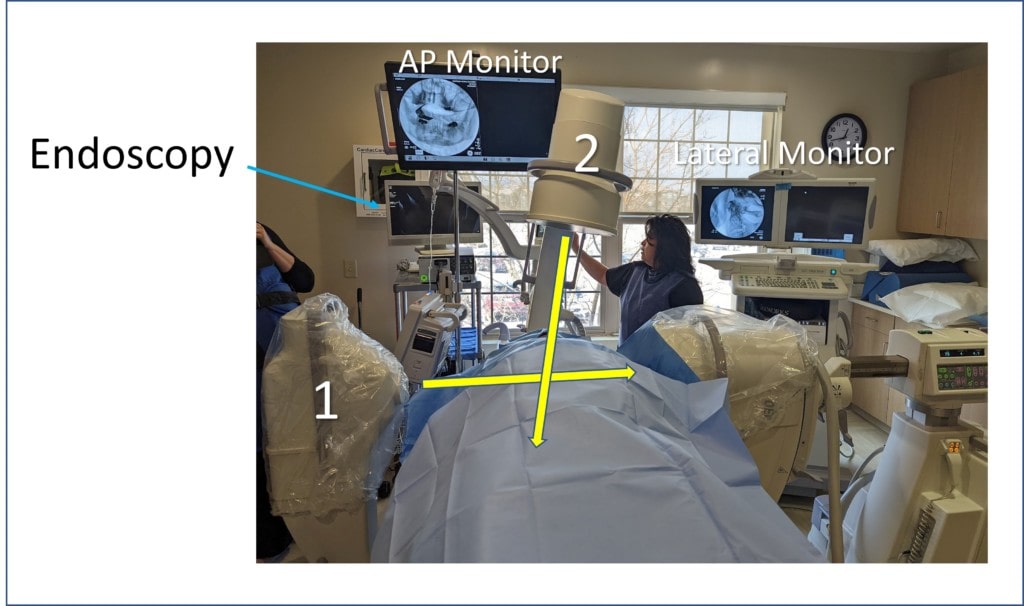
In dual-axis fluoroscopy, we have two c-arms being used at once. One is set up in the AP view (#2 as shown above) and one is set up in the lateral view (above marked as #1). Hence, there is no reason to move either, the doctor just presses the button for the right view and in seconds can see the position of the needle from both views. Hence for parts of the PICL procedure like going above the atlas bone to localize the needle in the alar ligament, this instant double view makes it easier and more accurate to inject that structure. In addition, since extra-radiation isn’t being used to tune the image each time the C-arm is moved, the patient is exposed to less radiation overall.
[The PICL procedure also uses an endoscope which is also shown above, so there are three active monitors during that procedure. The endoscope allows the area in the back of the throat to be kept sterile.].
Is This Expensive?
Yes, fluoroscopy is expensive. Meaning a good C-arm with advanced features like digital subtraction angiography (needed to be able to perform upper neck facet injections) costs about 120K. In addition, that lives in a special room with double or leaded drywall. On top of that, a specially trained employee called a rad tech needs to operate the C-arm. In our case of dual-axis fluoroscopy, we added a second smaller C-arm that costs about 80K for the fixed AP-view. So this is a several hundred K set-up once all is said and done.
The upshot? While dual-axis C-arms fluoroscopy isn’t needed at most advanced interventional orthobiologics sites, for specific procedures that require a huge amount of back and forth on the C-arm it can save time and improve accuracy. As you can see from the images above, it also looks very cool!

If you have questions or comments about this blog post, please email us at [email protected]
NOTE: This blog post provides general information to help the reader better understand regenerative medicine, musculoskeletal health, and related subjects. All content provided in this blog, website, or any linked materials, including text, graphics, images, patient profiles, outcomes, and information, are not intended and should not be considered or used as a substitute for medical advice, diagnosis, or treatment. Please always consult with a professional and certified healthcare provider to discuss if a treatment is right for you.
